A step-by-step guide to building a face counter that works directly in your browser — no local setup needed.
📖 Introduction
Building a face detection app sounds like it needs a powerful local machine, a webcam driver, and a full OpenCV setup. But what if you could do it entirely inside Google Colab — for free, in the browser?
In this blog, we'll walk through a Python program that:
- Accesses your browser webcam using JavaScript
- Captures a real-time frame and passes it to Python
- Detects faces using a deep learning model (ResNet-SSD)
- Displays the result with bounding boxes and a face count
🧱 Why Not Just Use cv2.VideoCapture(0)?
If you've used OpenCV locally, your first instinct is:
python
cap = cv2.VideoCapture(0) # Open webcam
This works on your local machine — but in Google Colab, it fails silently.
The solution: Use JavaScript to access the browser's webcam, capture a frame, and send it to Python as a base64-encoded image.
📦 Packages Used
1. opencv-python-headless
1pip install opencv-python-headlessOpenCV (Open Source Computer Vision Library) is the backbone of this project. We install the headless variant because:
- The regular opencv-python includes GUI dependencies (cv2.imshow, etc.)
- Colab has no display server, so those dependencies cause errors
- headless gives us all image processing features without the GUI bloat
Used for:
- Reading and decoding images (cv2.imdecode)
- Drawing bounding boxes (cv2.rectangle, cv2.putText)
- Running the DNN face detector (cv2.dnn)
- Color space conversion (cv2.cvtColor)
2. IPython.display (built into Colab)
1from IPython.display import display, Javascript, ImageThis is IPython's display system — it lets us render rich content inside Colab cells.
Class | What it does
- Javascript | Executes JS code inside the browser
- Image | Renders a raw image (bytes) inline in the notebook
- display() | Outputs any of the above into the cell
3. google.colab.output.eval_js (built into Colab)
1from google.colab.output import eval_jsThis is the bridge between Python and JavaScript in Colab. It:
- Runs a JavaScript expression in the browser
- Waits for it to resolve (supports Promise)
- Returns the result back to Python as a string
This is how we get the webcam image from the browser into Python memory.
4. base64 (Python standard library)
1from base64 import b64decodeWhen the browser sends an image via JavaScript's canvas.toDataURL(), it returns a base64-encoded string like:
data:image/jpeg;base64,/9j/4AAQSkZJRgABAQ...
We strip the data:image/jpeg;base64, prefix and decode the rest into raw bytes using b64decode.
5. numpy (built into Colab)
1import numpy as npNumPy is used to convert the raw image bytes into an array that OpenCV can process:
1img_array = np.frombuffer(img_bytes, dtype=np.uint8)
2frame = cv2.imdecode(img_array, cv2.IMREAD_COLOR)
OpenCV works with NumPy arrays internally — every image is a 3D array of shape (height, width, channels).
🔬 The DNN Face Detector — Why Not Haar Cascade?
We went through two approaches in this project:
❌ Approach 1: Haar Cascade (failed)
1face_cascade = cv2.CascadeClassifier(
2    cv2.data.haarcascades + 'haarcascade_frontalface_default.xml'
3)
4faces = face_cascade.detectMultiScale(gray, scaleFactor=1.1, minNeighbors=5)
Haar Cascade is fast and built into OpenCV, but it has serious limitations:
- Requires a fully visible, frontal face
- Fails with partial faces (cropped at edges)
- Struggles with head tilts beyond ~15°
- Less accurate with beards or facial hair
- Inconsistent with varied skin tones
✅ Approach 2: ResNet-SSD DNN (what we use)
1# Download the model files
2wget https://raw.githubusercontent.com/opencv/opencv/master/.../deploy.prototxt
3wget https://github.com/opencv/opencv_3rdparty/.../res10_300x300_ssd_iter_140000.caffemodel
The ResNet-10 + SSD (Single Shot MultiBox Detector) model is a lightweight deep learning face detector trained by OpenCV. It's stored as two files:
File | Purpose
deploy.prototxt | Defines the neural network architecture
res10_300x300_ssd_iter_140000.caffemodel | Pre-trained weights (140,000 iterations)
Comparison:
Feature | Haar Cascade | ResNet-SSD DNN
- Partial faces | ❌ | ✅
- Head tilt | ❌ | ✅
- Beards | ❌ Sometimes | ✅
- Varied lighting | ❌ | ✅
- Confidence score | ❌ | ✅
Speed | ⚡ Fast | 🐢 Slightly slower
🧩 Step-by-Step Code Breakdown
Step 1 — Camera Warmup via JavaScript
1data = eval_js(f'''
2    new Promise((resolve, reject) => {{
3        const video = document.createElement('video');
4        navigator.mediaDevices.getUserMedia({{ video: true }})
5        .then(stream => {{
6            video.srcObject = stream;
7            video.play();
8
9            const waitReady = setInterval(() => {{
10                if (video.videoWidth > 0) {{
11                    clearInterval(waitReady);
12
13                    // Warmup: capture N frames before saving
14                    let count = 0;
15                    const canvas = document.createElement('canvas');
16                    const warmup = setInterval(() => {{
17                        canvas.getContext('2d').drawImage(video, 0, 0);
18                        if (++count >= {warmup_frames}) {{
19                            clearInterval(warmup);
20                            stream.getTracks().forEach(t => t.stop());
21                            resolve(canvas.toDataURL('image/jpeg', 0.95));
22                        }}
23                    }}, {interval_ms});
24                }}
25            }}, 100);
26        }});
27    }})
28''')
Why the warmup? Webcams use auto-exposure — the first frame is often underexposed (very dark) because the sensor hasn't adjusted yet. By capturing 15 frames at 150ms intervals (~2.2 seconds total), we allow the camera's auto-exposure to stabilize before taking the actual image.
Step 2 — Decode the Image
1blob = cv2.dnn.blobFromImage(
2    cv2.resize(frame, (300, 300)),  # model expects 300x300
3    scalefactor=1.0,
4    size=(300, 300),
5    mean=(104.0, 177.0, 123.0)     # BGR mean subtraction (ImageNet values)
6)
blobFromImage does three things:
- Resizes the image to 300×300 (required input size)
- Subtracts mean values per channel — this normalizes pixel values and improves accuracy
- Returns a 4D blob of shape (1, 3, 300, 300) — batch size, channels, height, width
Step 4 — Run the Detector
1net.setInput(blob)
2detections = net.forward()  # shape: (1, 1, 200, 7)
The output tensor has shape (1, 1, N, 7) where each detection is:
[batch, _, detection_id, class, confidence, x1, y1, x2, y2]
We filter by confidence threshold:
1for i in range(detections.shape[2]):
2    confidence = detections[0, 0, i, 2]
3    if confidence > 0.5:   # only keep detections > 50% confident
4        box = detections[0, 0, i, 3:7] * np.array([w, h, w, h])
The bounding box coordinates are normalized (0.0 to 1.0), so we multiply by the original image dimensions to get pixel coordinates.
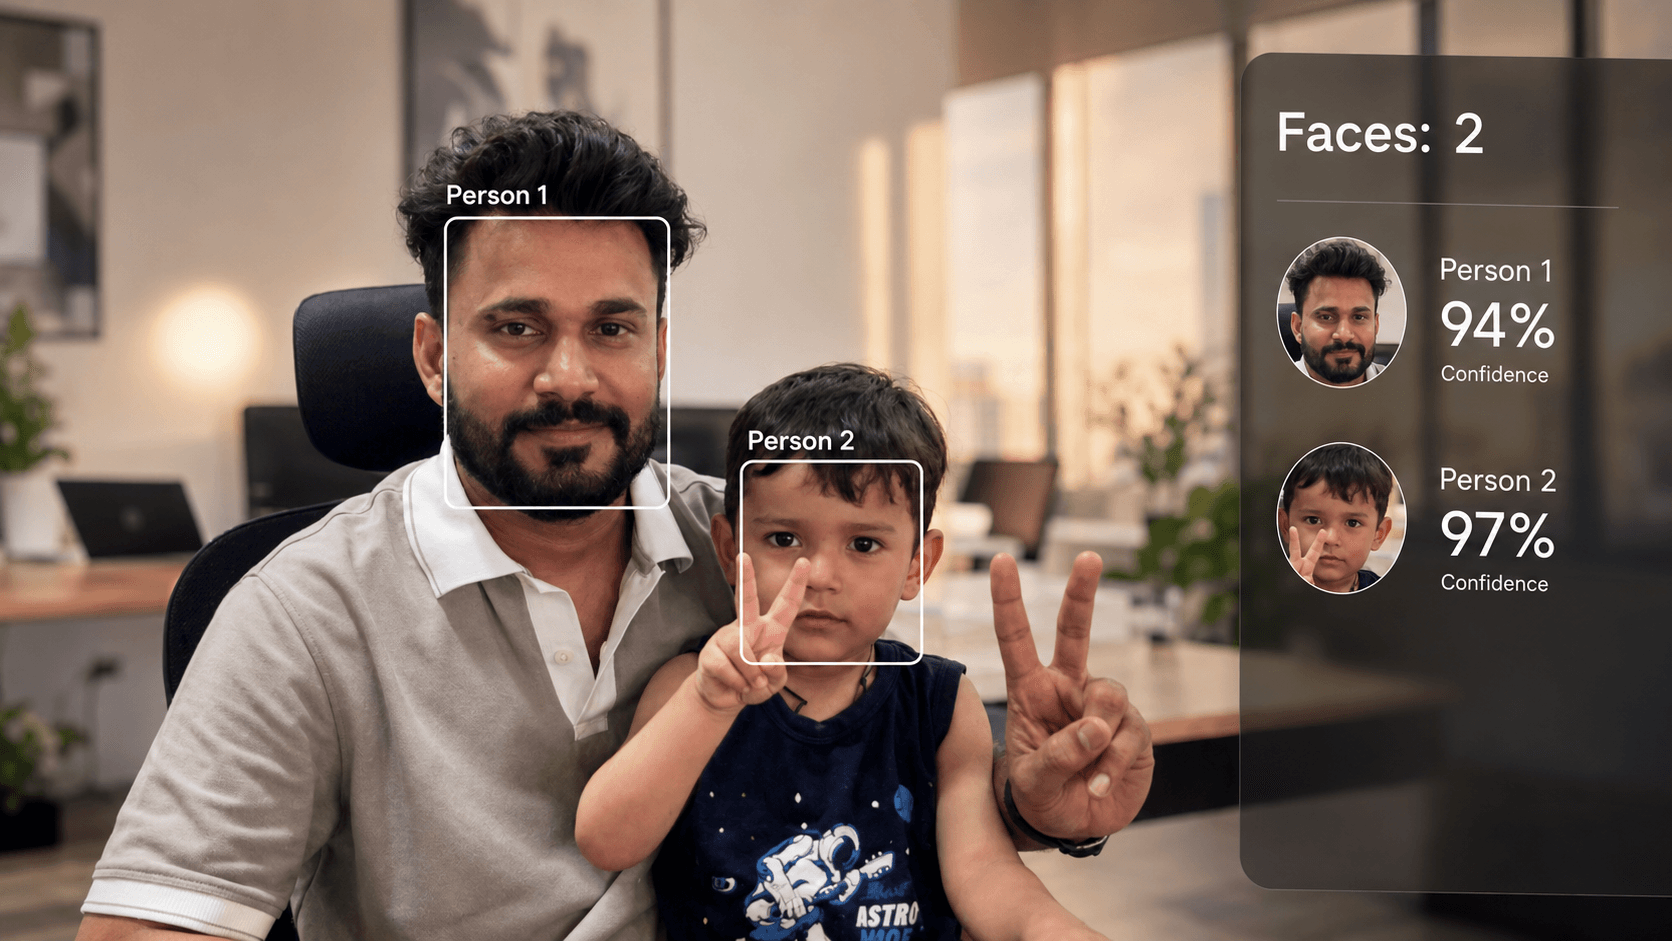
Step 5 — Draw Results and Display
1cv2.rectangle(frame, (x1, y1), (x2, y2), (0, 200, 0), 2)
2cv2.putText(frame, f"{confidence*100:.0f}%", (x1, y1-8),
3            cv2.FONT_HERSHEY_SIMPLEX, 0.6, (0, 200, 0), 2)
4
5# Display in Colab
6_, buffer = cv2.imencode('.jpg', frame)
7display(Image(data=buffer.tobytes()))
Since Colab has no window system, we encode the frame as a JPEG byte buffer and display it using IPython's Image class directly in the cell output.
🎛️ Tuning Parameters
Parameter | Default | Effect
warmup_frames | 15 |More frames = better exposure, but slower
interval_ms | 150 | Delay between warmup frames
confidence_threshold | 0.5
Lower = more detections, higher = fewer false positives
If faces are being missed:
- python
- result, count = detect_faces_dnn(frame, confidence_threshold=0.3)
If too many false positives:
- python
- result, count = detect_faces_dnn(frame, confidence_threshold=0.7)
💡 Possible Improvements
Idea | How
- Continuous video stream |Loop capture_frame() in a cell with clear_output()
- Face recognition | Use face_recognition lib or DeepFace to identify who each face is
- Save output image | cv2.imwrite('result.jpg', result_frame) then download
- Count faces in uploaded image | Replace webcam capture with a file upload widget
- Use a better model | Try YOLOv8-face or MediaPipe Face Detection for higher accuracy
✅ Final Thoughts
This project demonstrates a common real-world pattern: bridging two runtimes (browser JS + server-side Python) to solve a problem that neither can solve alone. Colab's eval_js is the key that makes it work.
The switch from Haar Cascade to ResNet-SSD was also an important lesson — always match your detector to your real-world conditions. A model that works perfectly in demos can completely fail on real webcam footage.
Built with Python, OpenCV, and Google Colab. No local setup required.
Share this article
Found it helpful? Share it with your network.
Related Posts

LangChain for JS Developers: Models, Prompts, Memory & Chains
A practical guide to LangChain for JavaScript and TypeScript developers. Learn Models, Prompt Templates, Output Parsers, Memory, and Chains — with real code examples you can use today.